If you’ve ever picked up a box where the logo quietly shines while the rest of the surface stays soft and matte, you were almost certainly looking at spot UV printing in action.
It’s a small detail — but one that separates forgettable packaging from the kind customers actually want to keep. Brands across cosmetics, tech, and luxury goods rely on this finish to make logos, product names, and patterns pop without turning the entire box into a mirror.
In this guide, we’ll break down exactly what spot UV is, how the process works from start to finish, where it makes the biggest impact, and what you need to get right before sending your files to print.
What Is Spot UV Printing?
Spot UV is a post-print finishing technique where a clear, high-gloss UV varnish is applied to specific areas of a printed surface — not the entire sheet. The “spot” in the name refers to the selective placement: only the areas you choose (a logo, a headline, a pattern) receive the glossy coating.
The rest of the surface is typically left with a matte or soft-touch lamination, which creates a striking contrast. Glossy elements catch the light and feel slightly raised under your fingertips, while the matte background stays smooth and understated.
It’s important to understand that spot UV is a coating process, not a printing method. It doesn’t add new colors to your design. Instead, it changes how the surface reflects light and feels to the touch. That’s why the same technique goes by several names in the industry — spot gloss, spot varnish, UV spot coating, spot gloss UV — but they all describe the same core idea: a targeted, UV-cured clear coat applied where you want emphasis.
Where Is Spot UV Commonly Used?
You’ll find spot UV finishing on a wide range of printed materials, though it appears most frequently on products where first impressions drive purchasing decisions:
- Product packaging (cosmetics, skincare, electronics, premium food)
- Business cards and corporate stationery
- Brochures, lookbooks, and catalogs
- Book covers and presentation folders
- Invitation cards and event collateral
In every case, the goal is the same: draw the eye to key brand elements without overwhelming the design.
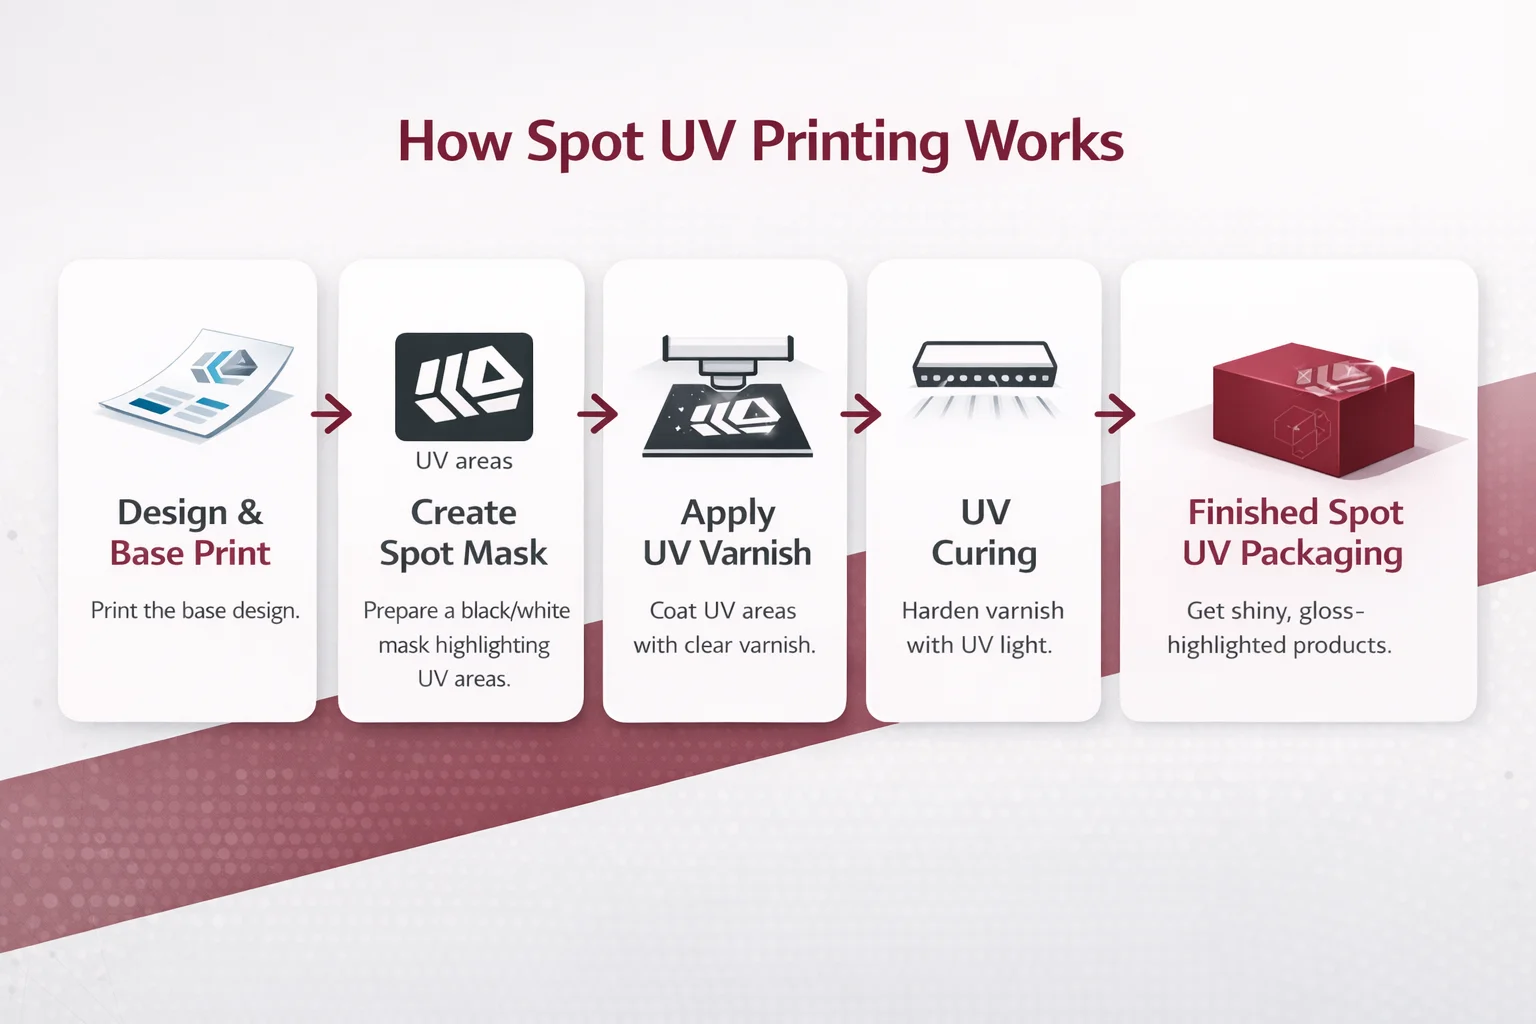
How Does Spot UV Printing Work? (Step-by-Step)
The final result may look effortless, but the production process behind spot UV is precise and methodical. Here’s what happens at each stage.
Step 1: Base Printing
Your artwork is printed first using standard CMYK offset or digital printing on the chosen substrate — whether that’s coated card stock, packaging board, or specialty paper. At this stage, nothing UV-specific has happened. This is conventional full-color printing.
Step 2: Lamination (Optional but Recommended)
Most spot UV jobs include a matte, satin, or soft-touch lamination applied over the entire printed sheet before the UV step. This lamination serves two purposes: it protects the underlying print, and — more importantly — it creates the matte base that makes the glossy UV areas stand out dramatically.
Without this contrast layer, the spot UV effect is far less impactful. This step is technically optional, but skipping it significantly reduces the visual payoff.
Step 3: Creating the Spot UV Mask
This is where precision matters most. Your designer prepares a separate mask file — essentially a map that tells the printer exactly where to apply the UV varnish.
The mask file must follow strict technical requirements:
- 100% black (K only) on a dedicated layer — black means “apply UV here,” white means “no UV.”
- Vector-based paths for clean, sharp edges.
- No gradients, drop shadows, transparencies, or blurs. The UV varnish is either applied or it isn’t — there’s no “partial gloss.”
A poorly prepared mask is the single most common reason spot UV jobs go wrong. We’ll cover design best practices in detail below.
Step 4: Applying the UV Varnish
A clear liquid UV varnish is applied to the masked areas using one of two methods:
- Silk-screen application — the traditional method, ideal for larger spot areas and heavier coatings.
- Digital spot UV — uses inkjet-style heads for precise placement, better suited for fine details and shorter runs.
Because the varnish is completely transparent, it adds no color — only gloss, texture, and a subtle raised dimension.
Step 5: UV Curing
The printed sheets pass under high-intensity ultraviolet lamps immediately after the varnish is applied. The UV light triggers an instant chemical reaction:
- The varnish hardens within seconds (no extended drying time).
- The coated areas become glossy and slightly raised above the surrounding matte surface.
- The result is a crisp, durable, tactile finish that won’t smudge, peel, or fade under normal handling.
This instant curing is one of spot UV’s practical advantages over solvent-based coatings — it speeds up production timelines significantly.
Why Do Brands Invest in Spot UV? (5 Key Benefits)
A reasonable question: why add this extra step and cost when a simple gloss or matte finish exists? Because spot UV solves multiple branding challenges simultaneously.
1. Visual Impact Through Contrast
A fully matte box looks clean but can feel flat. A fully glossy box catches light but lacks sophistication. Spot UV gives you both — the quiet elegance of matte with the eye-catching shine of gloss, applied exactly where it counts.
The human eye is naturally drawn to contrast. When a glossy logo sits against a matte background, it creates a depth effect that makes the design appear almost three-dimensional. On a retail shelf crowded with competitors, this is often the detail that makes a customer reach for your box first.
2. Premium Perception (Without Premium Cost)
Spot UV is one of the most cost-effective ways to elevate perceived value. It signals that a brand has invested in the details — in the finishing, not just the formulation. For consumers, that extra layer of care translates directly into trust and quality perception.
This is why spot UV appears so frequently on products where brand experience justifies a higher price point: skincare, fragrance, electronics accessories, artisan food, and luxury gifts.
3. Tactile Engagement
Packaging isn’t just visual — it’s physical. Spot UV adds a raised, smooth texture to coated areas that customers can feel when they pick up the product. This tactile dimension triggers a deeper sensory connection with the brand, something flat printing simply cannot achieve.
Research in consumer psychology consistently shows that touch influences purchase decisions. A box that feels interesting in the hand gets more attention and is more likely to be remembered.
4. Functional Protection
The cured UV varnish forms a hard, resilient layer over the coated areas. While it doesn’t replace full-surface lamination, it adds meaningful protection where it’s applied — improved resistance to fingerprints, minor scratches, and moisture on high-touch areas like logos and product names.
5. Faster Production & Eco-Friendly Profile
UV coatings cure instantly under UV light, which means no extended drying time and faster production turnaround compared to solvent-based alternatives. Additionally, UV varnishes are typically solvent-free and emit no volatile organic compounds (VOCs) during curing, making them a more environmentally responsible option in the finishing process.
Spot UV on Business Cards: A Complete Guide
Business cards remain one of the most popular applications for spot UV, and for good reason — they’re small, personal, and handed directly from one person to another. The tactile impact is immediate and memorable.
What Does a Spot UV Business Card Look Like?
A typical spot UV business card follows this structure:
- Full-color CMYK printing on premium card stock (typically 350–400 gsm).
- Matte or soft-touch lamination applied to the entire card surface.
- Spot UV gloss applied selectively to one or two key elements — usually the logo, the person’s name, or a single graphic element.
The result is a card that feels velvety smooth in hand, with raised glossy highlights that catch light as the card moves. It’s an immediate, noticeable upgrade over standard matte or gloss cards — the kind of detail that makes people pause and look more closely.
Design Tips for Spot UV Business Cards
- Less is more. One or two spot UV elements create elegance. Glossing everything defeats the purpose.
- Logos work best. Your logo is the element you most want people to remember — make it the star.
- Avoid tiny text. Fine print in spot UV can fill in or lose sharpness. Keep UV elements above 8pt for text, and follow your printer’s minimum line width guidelines.
- Consider the back. A subtle spot UV pattern on the back of the card adds a surprise element when the recipient flips it over.
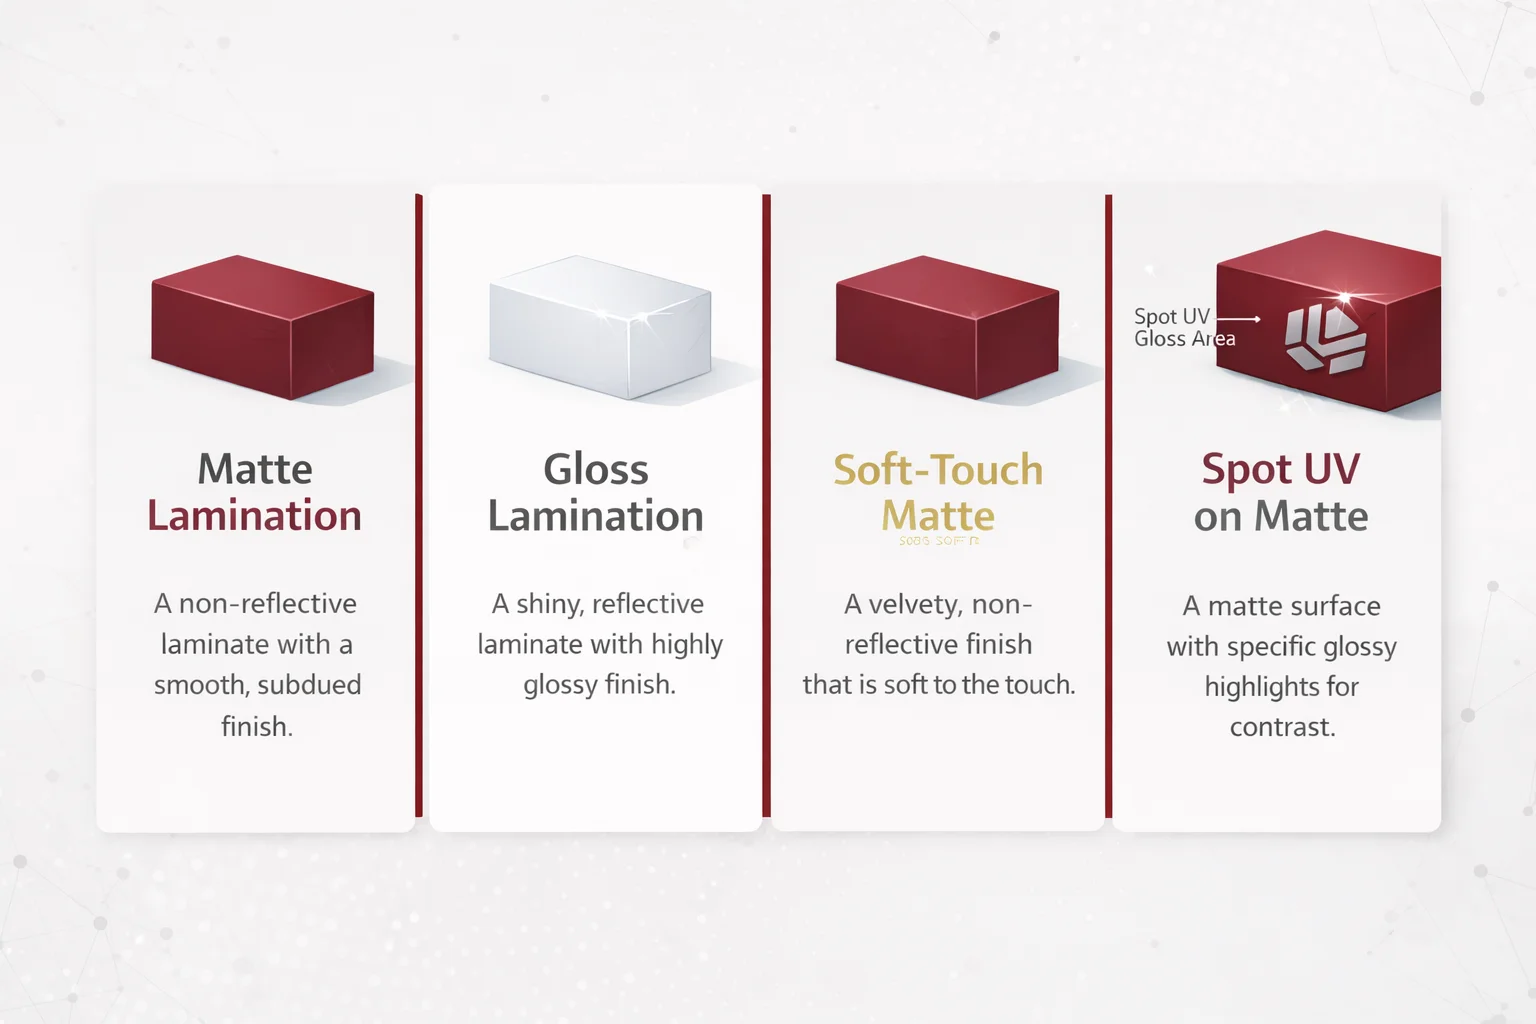
Best Finish Combinations with Spot UV
Spot UV’s visual impact depends heavily on what it’s paired with. Here are the three most effective combinations, each producing a distinctly different result.
Spot UV + Matte Lamination (The Industry Standard)
Best for: Retail packaging, tech products, cosmetics, corporate collateral.
Matte lamination provides a smooth, non-reflective surface with slightly muted color tones. When spot UV is applied on top, the glossy areas appear deeper, more vibrant, and more defined against the understated background. This is the most widely used combination in commercial packaging — modern, professional, and reliably impressive.
Spot UV + Matte Varnish (The Subtle Option)
Best for: Brochures, book covers, presentation folders, lighter-weight cartons.
Matte varnish is thinner and less pronounced than lamination, producing a softer contrast with the spot UV areas. The effect is more restrained — ideal for brands that want a luxury feel without obvious drama. It’s also more budget-friendly than lamination-based combinations.
Spot UV + Soft-Touch Lamination (The Premium Choice)
Best for: Luxury gift boxes, limited editions, high-end brand collateral, perfume packaging.
Soft-touch (also called velvet) lamination gives the surface a velvety, almost rubberized texture. When combined with spot UV, the contrast is extraordinary — ultra-soft matte background meets smooth, raised gloss. The logo or design element almost feels embossed, even though no embossing die was used.
This combination delivers the strongest tactile experience of any standard finishing option and is a go-to for brands where unboxing is part of the product experience.
Where Spot UV Packaging Makes the Biggest Impact
Spot UV works on virtually any printed packaging, but it delivers the highest ROI in categories where shelf presence and perceived quality directly influence purchase decisions:
- Cosmetics and skincare — where the box is the first touchpoint with the brand.
- Fragrance and fine jewelry — where packaging is part of the luxury experience.
- Consumer electronics — where a premium box justifies a premium price.
- Specialty food and gifting — chocolates, artisan products, hamper boxes.
- Rigid boxes and magnetic-close packaging — where the structure already says “premium” and the finish needs to match.
Within these categories, spot UV is most commonly applied to the brand name, product variant, signature pattern, or hero product illustration — whichever element needs to command attention first.
Design Best Practices for Spot UV (Avoid These Mistakes)
Great spot UV results start in the design file, not on the press. Here’s what experienced designers get right — and what beginners get wrong.
Keep Spot UV Areas Focused and Intentional
The most common beginner mistake is applying spot UV to too many elements. When everything is glossy, nothing stands out. Treat spot UV like a highlighter — it only works when used selectively.
A good rule of thumb: if you can’t explain in one sentence what the spot UV is drawing attention to, you’ve probably used too much.
Respect Minimum Line Widths
Spot UV varnish has physical thickness. Very thin lines (below 0.4mm) and small text can fill in, spread, or lose definition during application. Always check your printer’s specifications, but as a general guideline, keep spot UV elements at or above 0.5mm line width and avoid applying UV to text smaller than 7–8 pt.
Build a Technically Clean Mask File
Your spot UV mask is the single most important production file. If it’s wrong, the UV placement will be wrong — and there’s no fixing it after curing.
Mask file checklist:
- Separate layer, clearly labeled.
- 100% black (K only) — no CMYK mix, no spot colors.
- Vector paths only — no rasterized edges.
- Zero gradients, transparencies, or feathered edges.
- Perfectly aligned to the base artwork (registration is critical).
If your printer offers a preflight check for spot UV files, always use it. A five-minute review before printing saves expensive reprints after.
Account for Registration Tolerance
Even the best presses have slight registration variation (typically ±0.3mm). Design your spot UV elements with a small margin of safety — avoid placing glossy areas right at the edge of a colored element where even slight misalignment would be visible.

Material and Budget Considerations
Substrate Compatibility
Spot UV performs best on coated papers, laminated boards, and treated surfaces that don’t absorb the varnish before it can be cured. It works reliably on:
- Coated and laminated card stock
- SBS (Solid Bleached Sulfate) board
- Matte, gloss, and soft-touch laminated surfaces
It may perform poorly on uncoated stocks (which absorb the varnish), very thin papers (which can curl), and untreated plastics (where adhesion is unreliable). Always confirm compatibility with your print provider before committing to a run.
Budget and ROI
Spot UV adds an extra finishing step, which means higher per-unit cost compared to simple gloss or matte varnish. However, the cost difference is typically modest relative to the total packaging cost — especially on longer runs where setup costs are spread across more units.
Spot UV is usually a smart investment when:
- The product is positioned at a mid-to-premium price point.
- Packaging plays a visible role in the customer’s purchase or unboxing experience.
- You need to differentiate from competitors using standard finishes.
- The added perceived value justifies the marginal cost increase.
A simpler finish may be sufficient when:
- The product is extremely cost-sensitive and high-volume.
- Packaging isn’t visible at the point of sale (e.g., inner shipping boxes).
- The brand strategy doesn’t rely on premium perception.
Frequently Asked Questions
What is spot UV in printing?
Spot UV is a finishing technique where a clear, glossy UV-cured coating is applied to selected areas of a printed sheet. It creates visible shine, contrast, and a subtle raised texture on the coated areas while the rest of the surface remains matte.
Is spot UV the same as lamination?
No. Lamination covers the entire surface with a plastic film. Spot UV is a liquid coating applied only to specific areas. However, the two are often used together — matte lamination on the full surface, with spot UV applied on top for selective gloss.
What does spot UV look like on business cards?
On a business card, spot UV typically appears as a raised, glossy highlight on elements like the logo or name, set against a matte or soft-touch background. The effect is visible when the card catches light and noticeable to the touch.
Does spot UV protect the printed surface?
Yes, within the coated areas. The cured UV varnish creates a hard, glossy layer that offers improved resistance to fingerprints, minor scratches, and moisture. It doesn’t replace full lamination for overall protection, but it adds meaningful durability where applied.
What file format is needed for spot UV?
You’ll need to provide a separate mask file (or a clearly labeled layer within your design file) using 100% black to indicate where the UV should be applied. The mask must use vector paths with no gradients or transparency. Your printer will provide specific file preparation guidelines.
Can spot UV be applied to any paper?
It works best on coated or laminated surfaces. Uncoated papers tend to absorb the varnish, reducing the gloss effect. Always confirm substrate compatibility with your print provider before ordering.
How much does spot UV cost?
Cost varies by run size, coverage area, and application method (screen vs. digital). As a general range, spot UV adds a moderate premium to standard finishing costs — typically less impactful on longer runs. Request quotes from your printer with and without spot UV to compare.
Final Thoughts: Is Spot UV Right for Your Project?
Spot UV printing isn’t about making things shiny for the sake of shine. It’s a strategic finishing choice — a way to direct attention, create tactile engagement, and communicate quality through physical detail.
Choose spot UV when you want your packaging or printed materials to feel intentional and premium. When you want specific design elements to command attention without overpowering the rest. When you understand that in a crowded market, the brands that invest in how their products feel — not just how they look — are the ones customers remember.
Whether it’s a product box, a business card, or a brochure, the principle is the same: shine where it matters, restraint everywhere else.