If you’ve ever ordered custom packaging or dipped your toes into print design, chances are someone has thrown the word “dieline” at you and expected you to nod along. Don’t worry, you’re not alone in wondering what it actually means. The good news? Once you understand what a dieline is and how it works, the entire packaging production process starts to make a whole lot more sense.
In this complete guide, we’ll break down everything you need to know about dielines in packaging and print, from the dieline meaning and why they matter, to how to read them, create them, and avoid costly mistakes before your boxes ever hit the production floor.
What Is a Dieline? (Dieline Meaning Explained)
So, what is a dieline? In the simplest terms, a dieline is a flat, 2D template that acts as the structural blueprint for your custom packaging. Think of it as the architectural drawing of a box, it shows exactly where the material will be cut, folded, glued, and printed before it’s assembled into its final 3D shape.
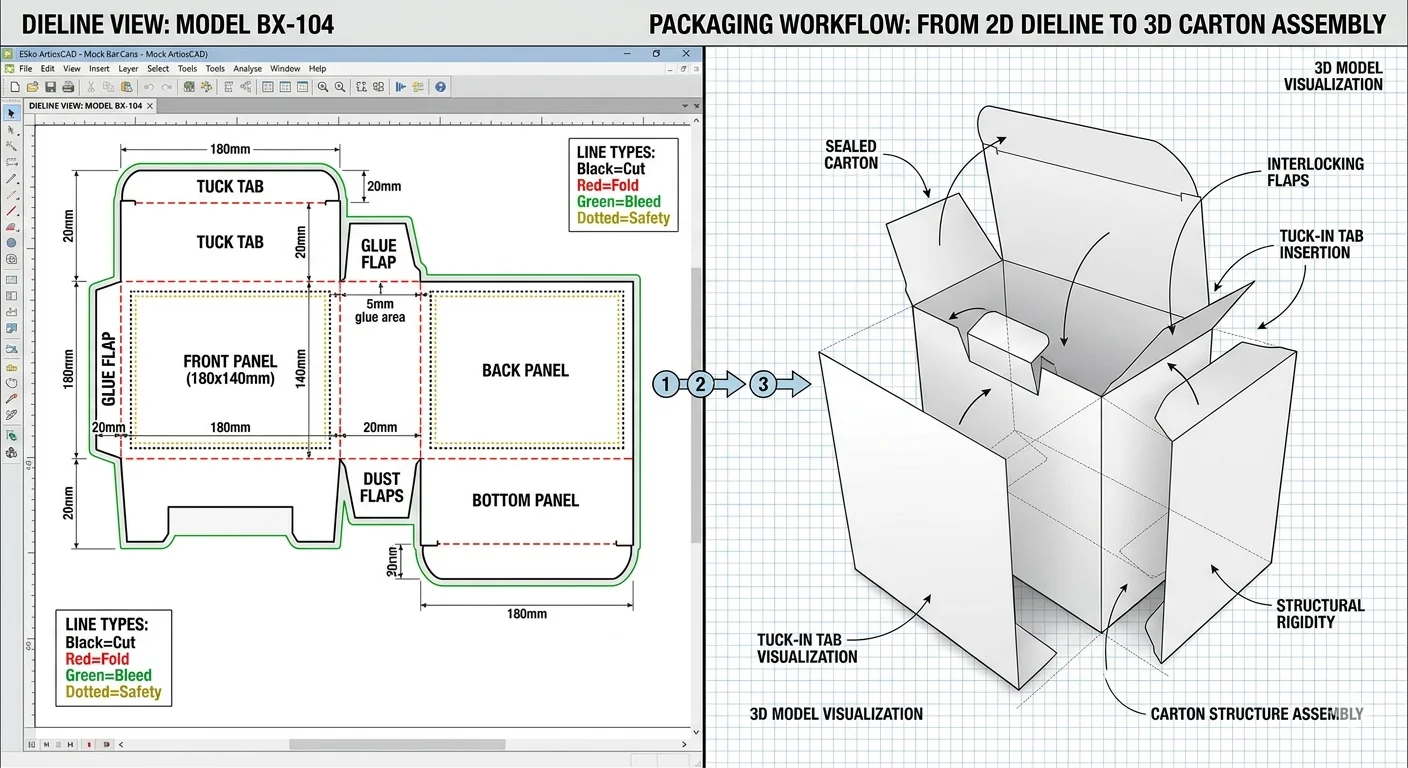
Whether you’re designing a product box, a mailer, a label, or a retail carton, the dieline is the foundation everything else is built on. It outlines every cut line, crease line, bleed area, and safe zone so designers and manufacturers are literally on the same page.
If you’ve seen terms like “die line,” “dye line,” “die-lines,” “dilines,” or even “dyeline” floating around online, they all refer to the same thing. The correct industry spelling is dieline (or “die line” as two words), but you’ll encounter these variations frequently. The debate of “dieline or dyeline” usually comes down to regional habits and autocorrect mishaps rather than any real technical difference.
In short, the dieline definition is this: a dieline is a vector-based technical drawing that shows the exact flat layout of a package, including all cut, fold, bleed, and safety markings needed for accurate production.
Why Dielines Are Essential in Packaging and Print
Dielines aren’t just a formality, they’re the backbone of every successful packaging project. Here’s why packaging dielines matter at every stage of design and production:
They Prevent Expensive Mistakes
Imagine printing 10,000 boxes only to discover your logo got trimmed off or your barcode is sitting on a fold line. Painful, right? Dielines for packaging help designers catch errors in artwork, structure, typography, and dimensions before production begins. This proofing stage usually involves several rounds of revisions, and that’s a good thing.
They Bring Your Design to Life in 3D
Once your flat dieline is ready, you can import it into 3D rendering software like Pacdora, Esko Studio, or Adobe Dimension to see a digital mockup of your packaging. This is where the magic happens. You’ll see how your artwork wraps around corners, how fold lines behave, how colors pop under light, and whether your design choices actually work in real life.
Sharing these 3D mockups with clients or stakeholders also makes approvals faster and reduces miscommunication, everyone sees exactly what they’re getting.
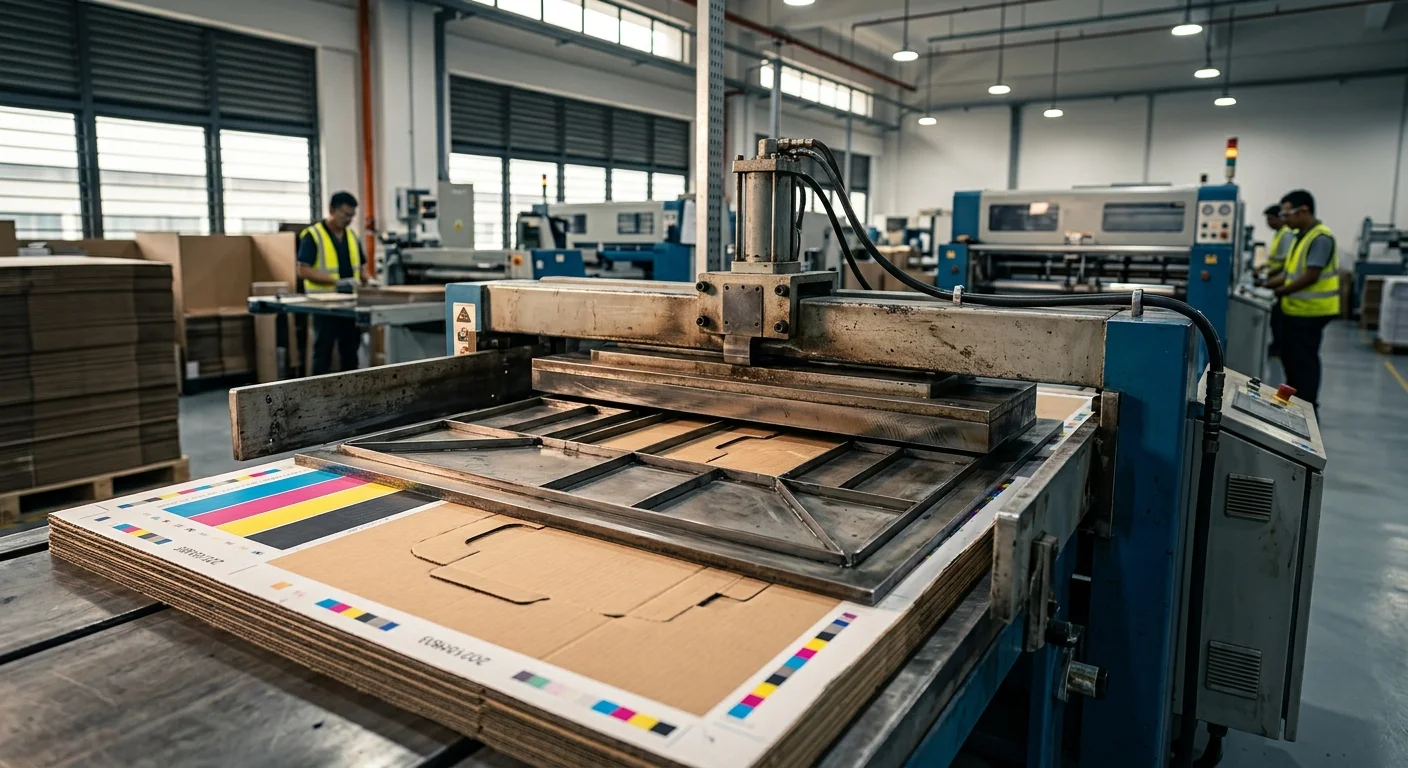
They Guide the Die-Cutting Process
After printing, packaging materials go through die-cutting, a process where custom shapes are cut from flat sheets using a die board. Manufacturers use your finalized dieline to program laser engravers that etch the die layout. Without an accurate dieline, die cut lines won’t align, and your entire run could be compromised.
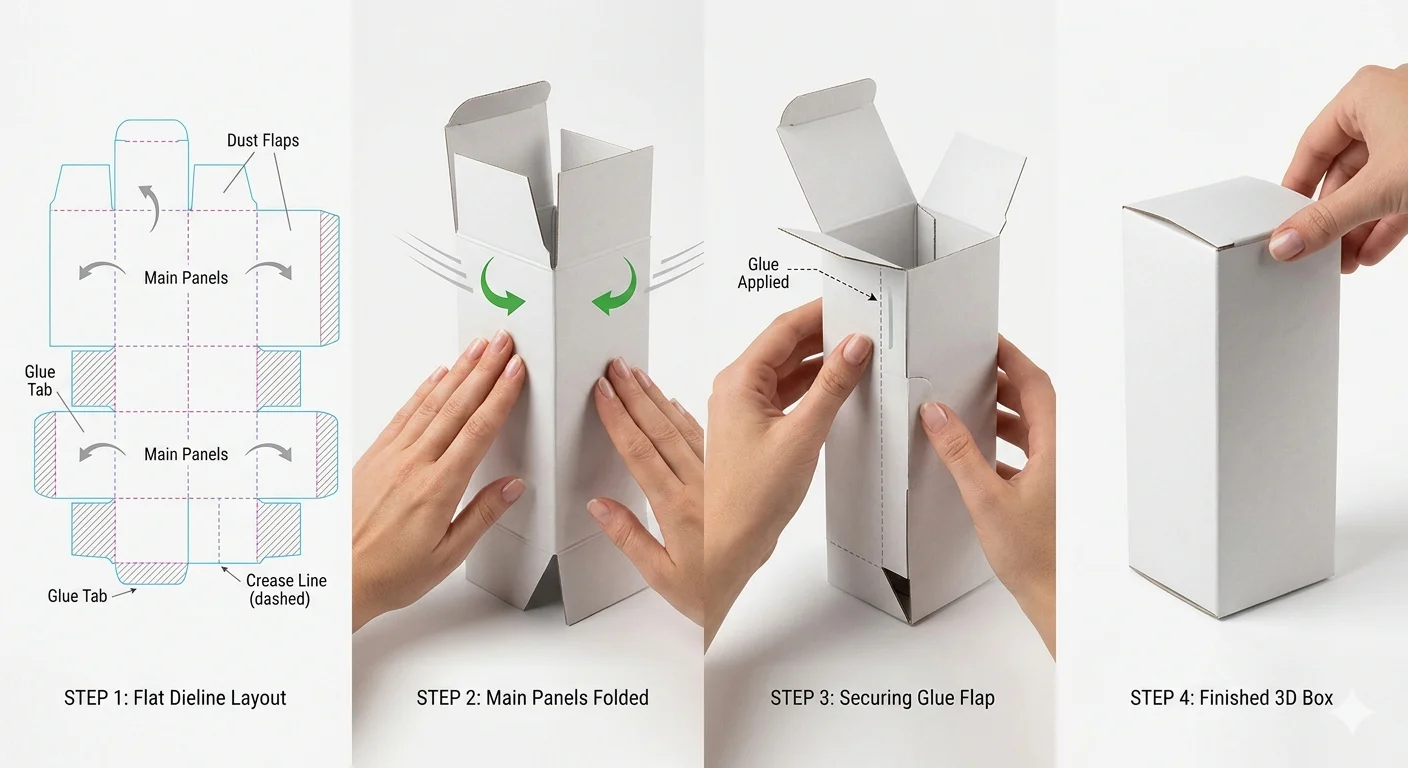
They Enable Reliable Prototyping
Before committing to mass production, a physical prototype based on your dieline template lets you test the structure, material strength, print quality, and overall feel of the packaging. It’s your last chance to make tweaks before the real run begins.
What Does a Dieline Look Like? (Dieline Examples)
If you’ve never seen one, a dieline can look a little intimidating at first, lots of lines, colors, and markings scattered across what appears to be an oddly shaped cutout. But each element has a specific purpose.
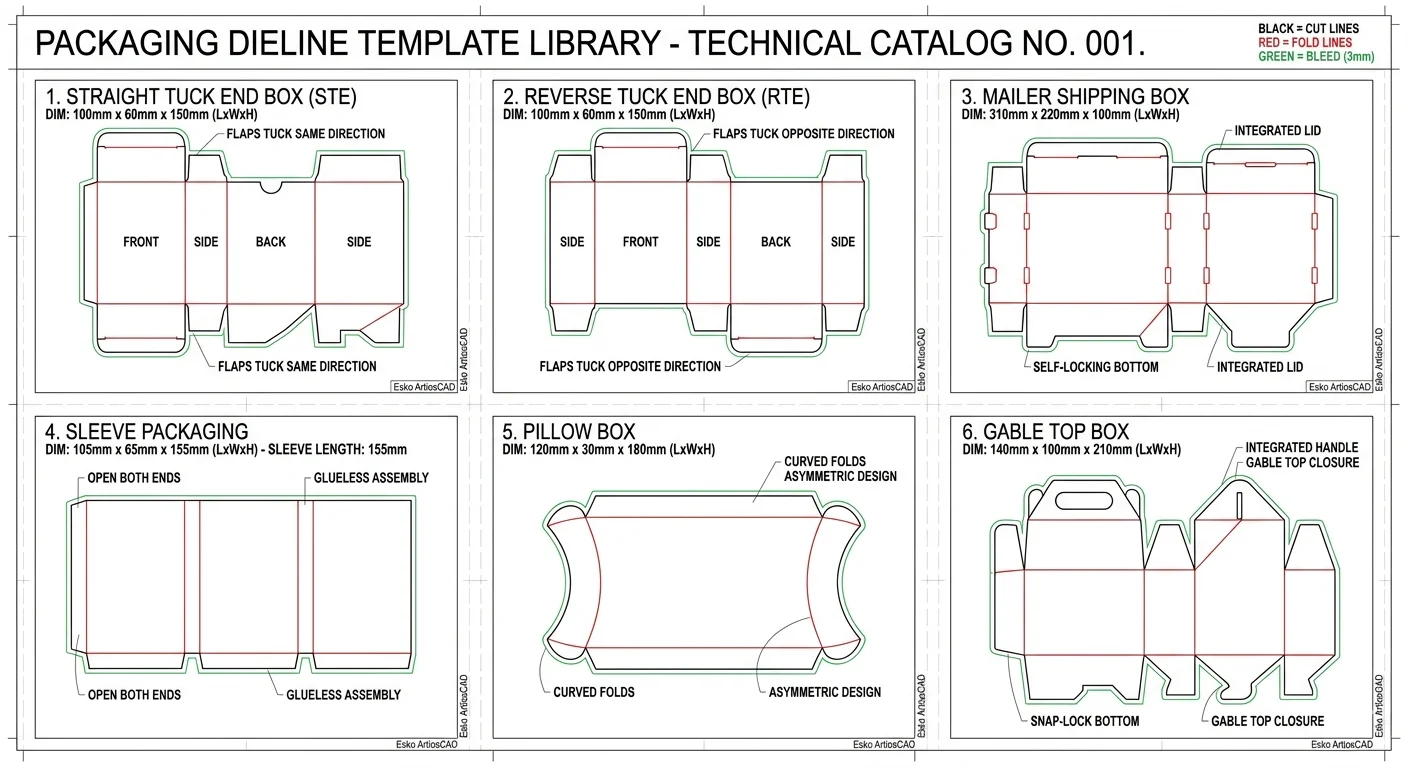
Here are common types of dieline examples you’ll come across:
Straight Tuck End Box
Popular for cosmetics, supplements, and retail products with clean front display.
Reverse Tuck End Box
Used for lightweight consumer goods with alternating top and bottom flap closures.
Mailer Box Dieline
Perfect for shipping and subscription products with self-locking flap construction.
Sleeve Packaging
Often paired with inner trays for premium retail and gift packaging applications.
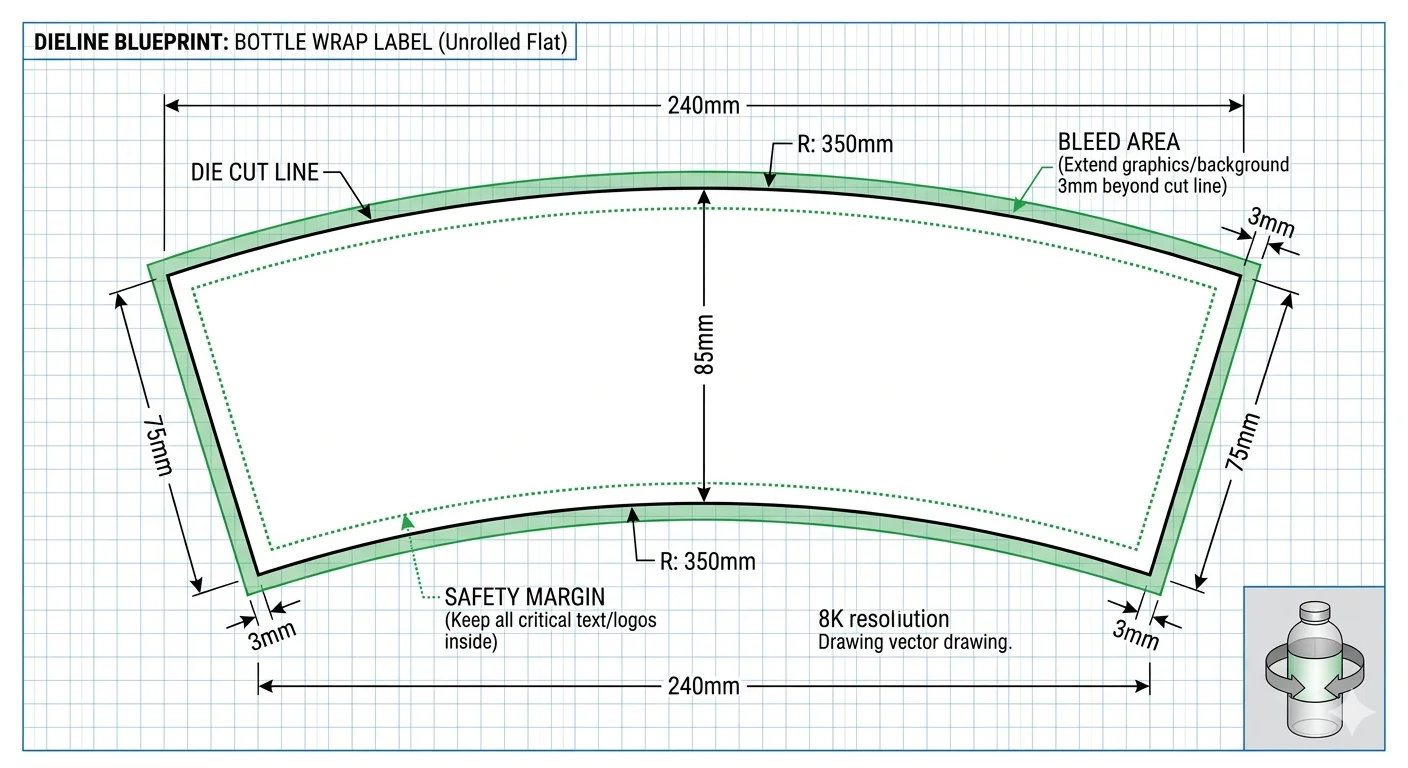
Label Dieline Template
Designed for bottles, jars, and containers with curved wraparound application.
Pillow & Gable Boxes
Decorative shapes for gifts, party favors, and specialty retail product packaging.
- Display boxes
- Window cartons
- Hexagon boxes
- Auto-bottom boxes
- Folding cartons
- Rigid boxes
Every box dieline shares the same core components, just arranged differently based on the final structure.
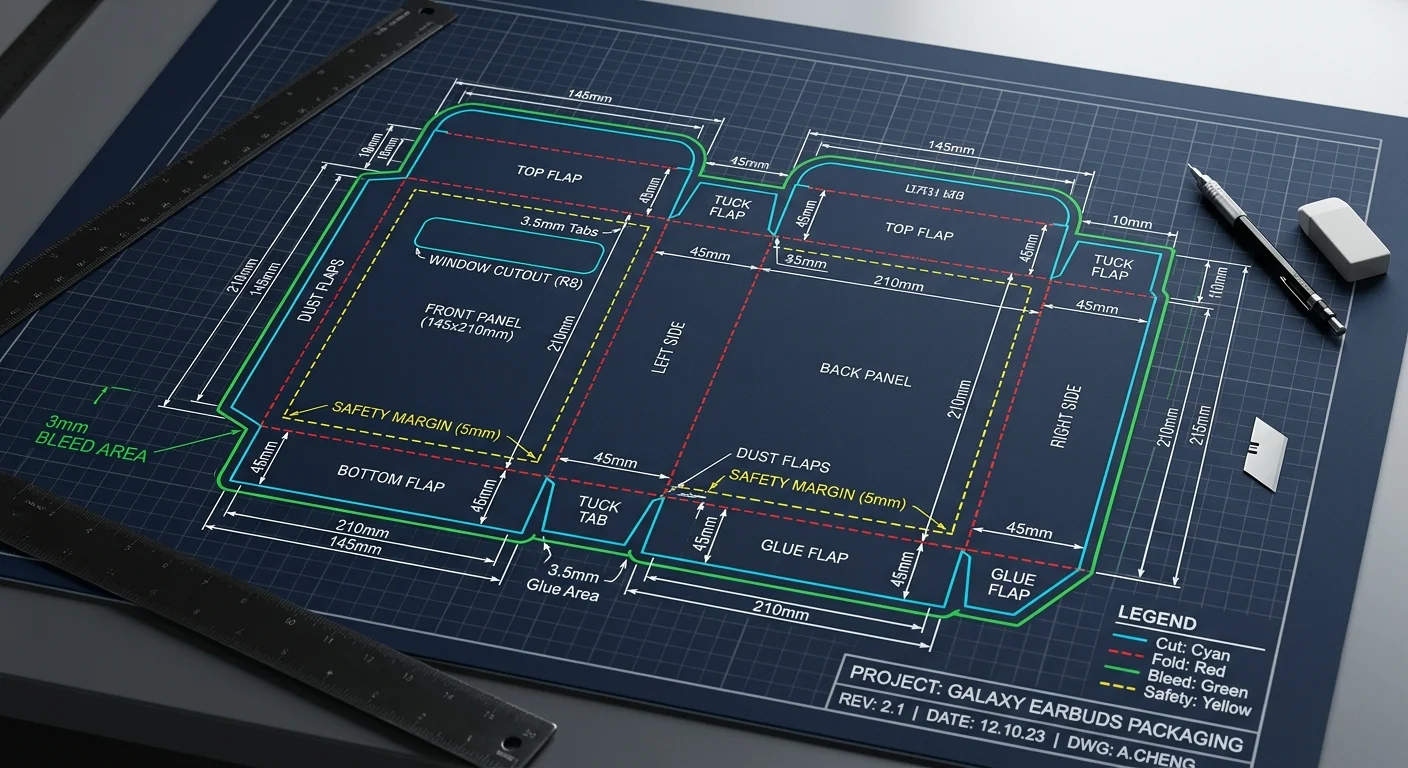
How to Read a Dieline: Every Marker Explained
Reading a dieline is a lot like reading a map, once you know what the symbols mean, everything clicks. While colors and conventions may slightly vary between manufacturers and software, these are the standard dieline components you’ll see across the packaging industry:
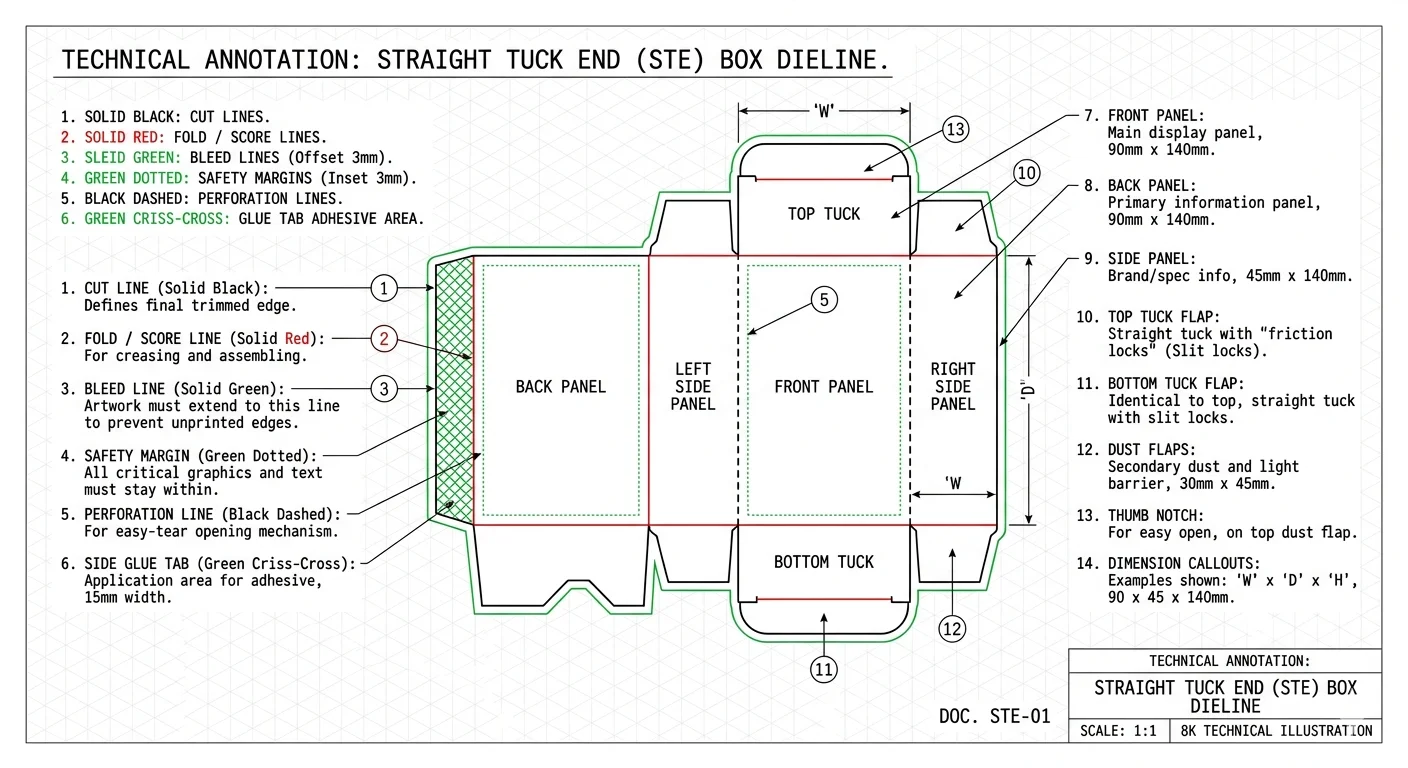
Cut Lines (Trim Lines)
Usually shown as solid black lines, these mark where the die-cutting machine will physically cut the material. Cut lines define the final outer edge of your package. Anything outside these lines won’t make it into the finished product.
Bleed Lines
Displayed as solid green lines, bleed lines extend about 0.125 inch (3mm) beyond the cut line. This extra space accounts for slight shifts during cutting. The rule of thumb: extend backgrounds, colors, and non-critical graphics all the way to the bleed line to avoid unwanted white edges, but keep logos, text, and important visuals inside the safe zone.

Fold Lines (Crease Lines)
Marked as solid red lines, these show where the material will be creased and folded to form the 3D structure. Getting fold lines right is essential, misplaced creases can ruin an otherwise perfect design.
Safety Lines (Margin Lines)
Shown as green dotted lines, safety lines indicate the “safe zone” where all important design elements should stay. Even if the die-cutter shifts slightly during production, anything inside the safety lines will remain untouched.
Perforation Lines
Usually represented as black dashed or dotted lines, perforation lines mark where the material should be punched with small cuts to allow tearing or easy opening, think tear-away strips on subscription boxes or ticket stubs.
Glue Tabs (Seal Tabs)
Often shown as green criss-cross patterns, glue tabs mark the areas where adhesive will be applied to hold the package together after folding.
Once you understand these markers, reading any dieline template becomes second nature, whether it’s for a luxury cosmetic box or a simple shipping mailer.
How to Create a Dieline: A Step-by-Step Overview
If you’re working with a professional packaging designer or manufacturer, they’ll usually handle the dieline printing setup for you. But understanding the process gives you a huge advantage, you’ll communicate better, avoid rework, and make smarter design decisions.
Here’s how dielines are typically created:
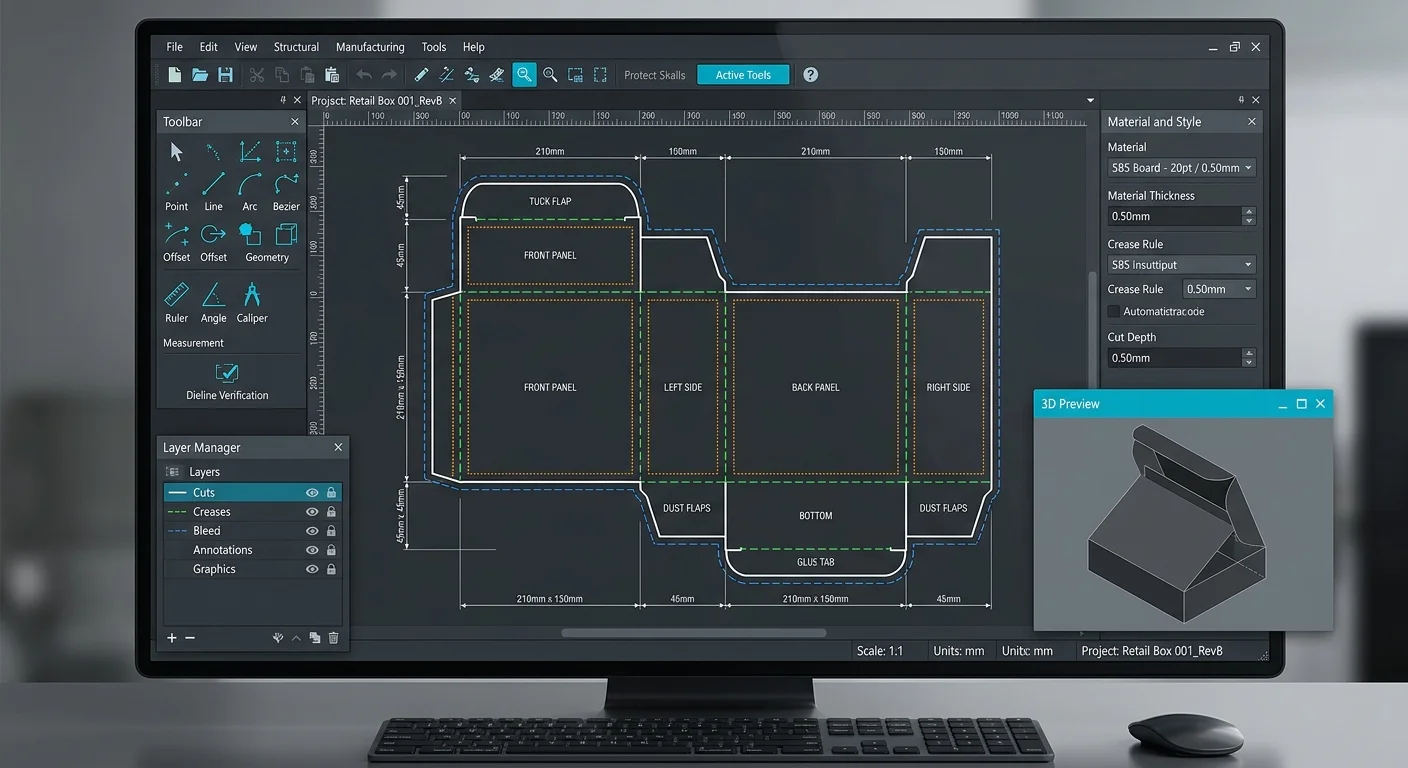
Step 1: Use Professional Structural Design Software
Creating accurate dielines requires specialized tools. ArtiosCAD is the industry gold standard for structural packaging design. It accounts for material type, thickness, weight, and integrates directly with die-cutting machines. Esko Studio is great for combining structural and graphic design workflows. Pacdora is a user-friendly online platform with pre-built dieline templates, perfect for beginners and small businesses. Adobe Illustrator is excellent for artwork and graphics, but not ideal for creating the structural dieline itself.
Step 2: Define the Flat Size and Layout
Before drawing anything, you need to know the exact flat dimensions of your package. The easiest way to get this right is to share an existing box or reference design with your designer. This gives them a concrete starting point and avoids guesswork.
If you’re working directly with a manufacturer, they’ll often send you a finalized dieline template with bleed requirements and production notes baked in.
Step 3: Add Dieline Markers
Every line on the dieline needs to be clearly labeled: cut lines, fold lines, bleed lines, safety lines, perforations, and glue tabs. These markers are what the production team relies on, leaving them out (or mislabeling them) is one of the most common causes of production errors.
Step 4: Save in the Right Output Format
When your dieline is finalized, save it in a vector format, PDF or AI (Adobe Illustrator) files are industry standards. Always set the color mode to CMYK (not RGB), since CMYK is what commercial printers use.

These formats preserve design precision, support easy edits, and ensure your file is ready for both printing and die-cutting without quality loss.
Common Dieline Mistakes to Avoid
Even experienced designers slip up on dielines from time to time. Here are the most frequent issues to watch for:
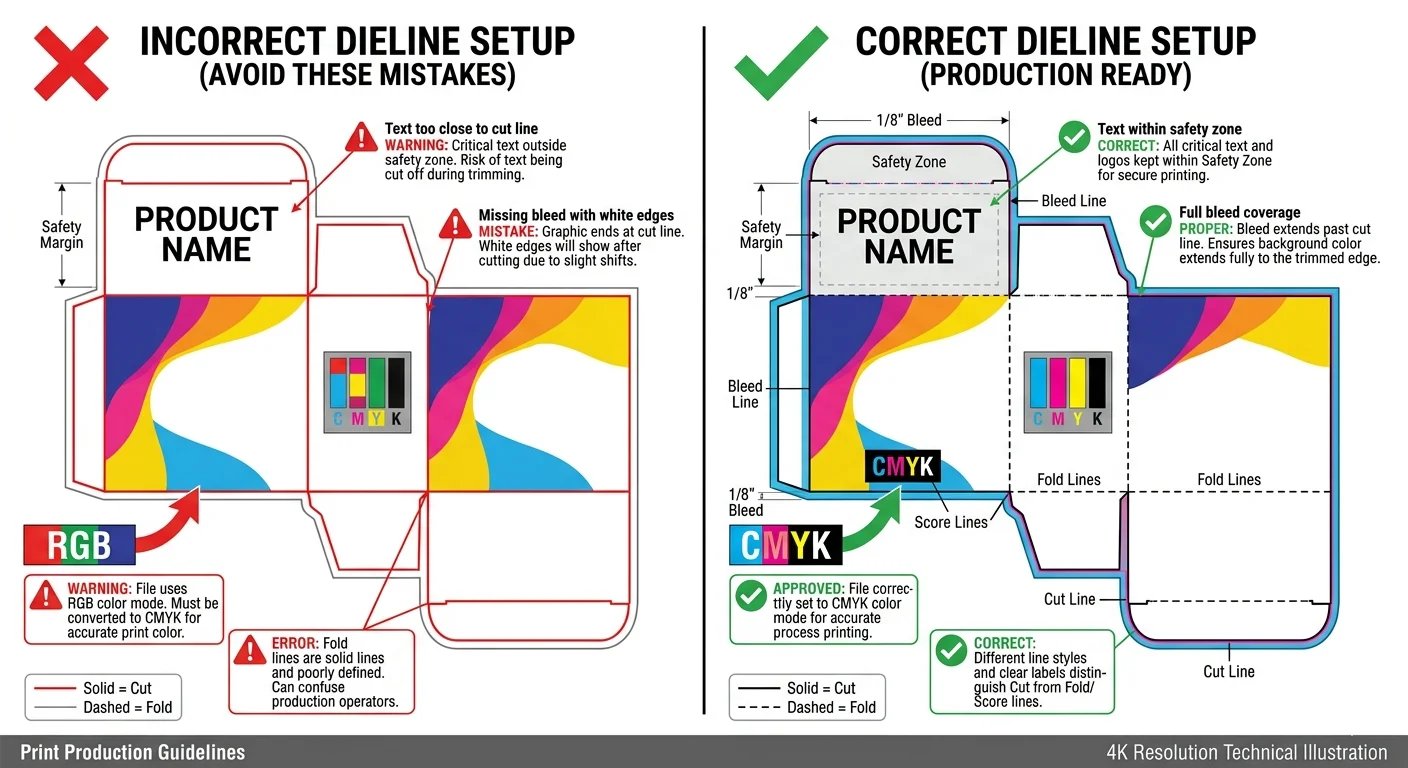
- Placing text or logos too close to cut lines, always keep critical elements inside the safety zone
- Forgetting bleed, missing bleed results in ugly white edges
- Using RGB instead of CMYK, colors will shift dramatically when printed
- Mixing up fold lines and cut lines, a small mislabel can ruin an entire batch
- Not accounting for material thickness, thicker materials need wider fold allowances
- Skipping the prototype stage, always test before mass production
Avoid These Mistakes — Let Our Experts Handle It
Get a flawless, production-ready dieline designed by professionals with 10+ years of experience.
Dieline FAQs
What is a dieline in printing?
In printing, a dieline is the vector template that tells the press and die-cutting machine where to print, cut, fold, and glue the material. It ensures everything lines up perfectly in the final product.
What is a dieline template?
A dieline template is a pre-made blueprint for a standard box or label style that you can customize with your own artwork. Platforms like Pacdora offer libraries of ready-to-use templates.
What’s the difference between a dieline and a die cut line?
A dieline is the complete blueprint that includes all lines and markings. A die cut line is specifically the line where the die will cut, it’s one component within the full dieline.
Dieline or dyeline, which is correct?
“Dieline” is the correct industry term. “Dyeline” is a common misspelling that comes from autocorrect or confusion with the old dyeline blueprint printing process (which is unrelated).
Do I need to create my own dieline?
Not necessarily. Most manufacturers provide dieline templates for their standard box styles. You just add your artwork and make sure everything falls within the correct zones.
Final Thoughts: Why Dielines Are Worth Understanding
Dielines might seem technical at first, but they’re the single most important tool in the packaging design process. They’re the bridge between your creative vision and a physical, shelf-ready product. Understanding what a dieline is, how to read one, and what to look out for puts you miles ahead, whether you’re a business owner ordering your first custom boxes or a designer leveling up your packaging skills.
The next time someone mentions packaging die lines, you’ll know exactly what they mean, and more importantly, you’ll know how to use them to get packaging that looks exactly the way you imagined.
Ready to design your own custom packaging? Start with a solid dieline, and everything else will fall into place.
🚀 Ready to Bring Your Packaging to Life?
Get a free custom dieline quote within 24 hours. No commitment, no hidden fees — just expert advice from our packaging specialists.